Announcements

10 Year Anniverary & New Releases Winners: Carrie Fancett Pagels' Butterfly Cottage - Melanie B, Dogwood Plantation - Patty H R, Janet Grunst's winner is Connie S., Denise Weimer's Winner is Kay M., Naomi Musch's winner is Chappy Debbie, Angela Couch - Kathleen Maher, Pegg Thomas Beverly D. M. & Gracie Y., Christy Distler - Kailey B., Shannon McNear - Marilyn R.
Showing posts with label Colonial baking. Show all posts

Monday, March 14, 2016

Tallow and Lard: Staples of a Colonial Household


1883 ad in the Hawai'i newspaper The Daily Bulletin
In the modern world, we've been taught that fat is a bad thing. Always. But throughout history? Fat in various forms is a staple of life. Science knows now that the human body needs fats in order to properly utilize certain nutrients, that fat itself contains elements crucial to brain development and immunity. In survival settings, limiting the diet to certain kinds of meat actually leads to starvation because they aren't fatty enough.

Not only were fats a crucial part of the historical diet, but they were also day-to-day staples for the colonial household. Tallow, the product of rendered beef or sheep fat, was used to make candles and soap, or rubbed into leather items such as shoes to make them more durable. (It was also a key ingredient in pemmican, a food developed by North American native peoples.)

Rendered pork fat is known as lard, and has a host of similar uses, including as a substitute for butter when milkfats were scarce. It's most famous in our time for being the favored shortening in pie crust, where it produces that lovely, tender flake we all love so much.

What is rendering, and why is it important? Well, raw fats (straight from the animal) will spoil, like any other animal product, and rendering is the process of separating water content from the pure fat, and making it shelf stable. Wet rendering is done by boiling or steaming the raw fat and skimming off the liquid as it rises to the top, and produces a more mild-tasting lard, with a higher smoke point. Dry rendering is done by heating the fat directly over the heat, without water, and resulting lard is more strongly flavored, with a lower smoke point.

When a friend offered me 20 or so pounds of frozen pork fat, which she'd thawed with the intent of making her own lard then was hit with a family crisis, of course I said yes. I love making my own pie crust with "real" ingredients, and more than that, I was curious about the process and the end result.

My friend also gave me instructions for rendering the lard in a crock pot, which sounded so easy I had to try it. And I managed to remember to stop and take photos along the way, which I rarely do, so I decided to share them here.

First was cutting the sections of hog fat into chunks and putting them in my crock pot. If those look like intestines, it's because that's exactly where they were located--the sections of fat along the intestinal tract. Everything was very clean, though. I started to trim away the bits of tissue and blood vessels, then decided that our pioneer foremothers probably weren't as choosy about that as we would be, and wound up tossing most of it in the pot.
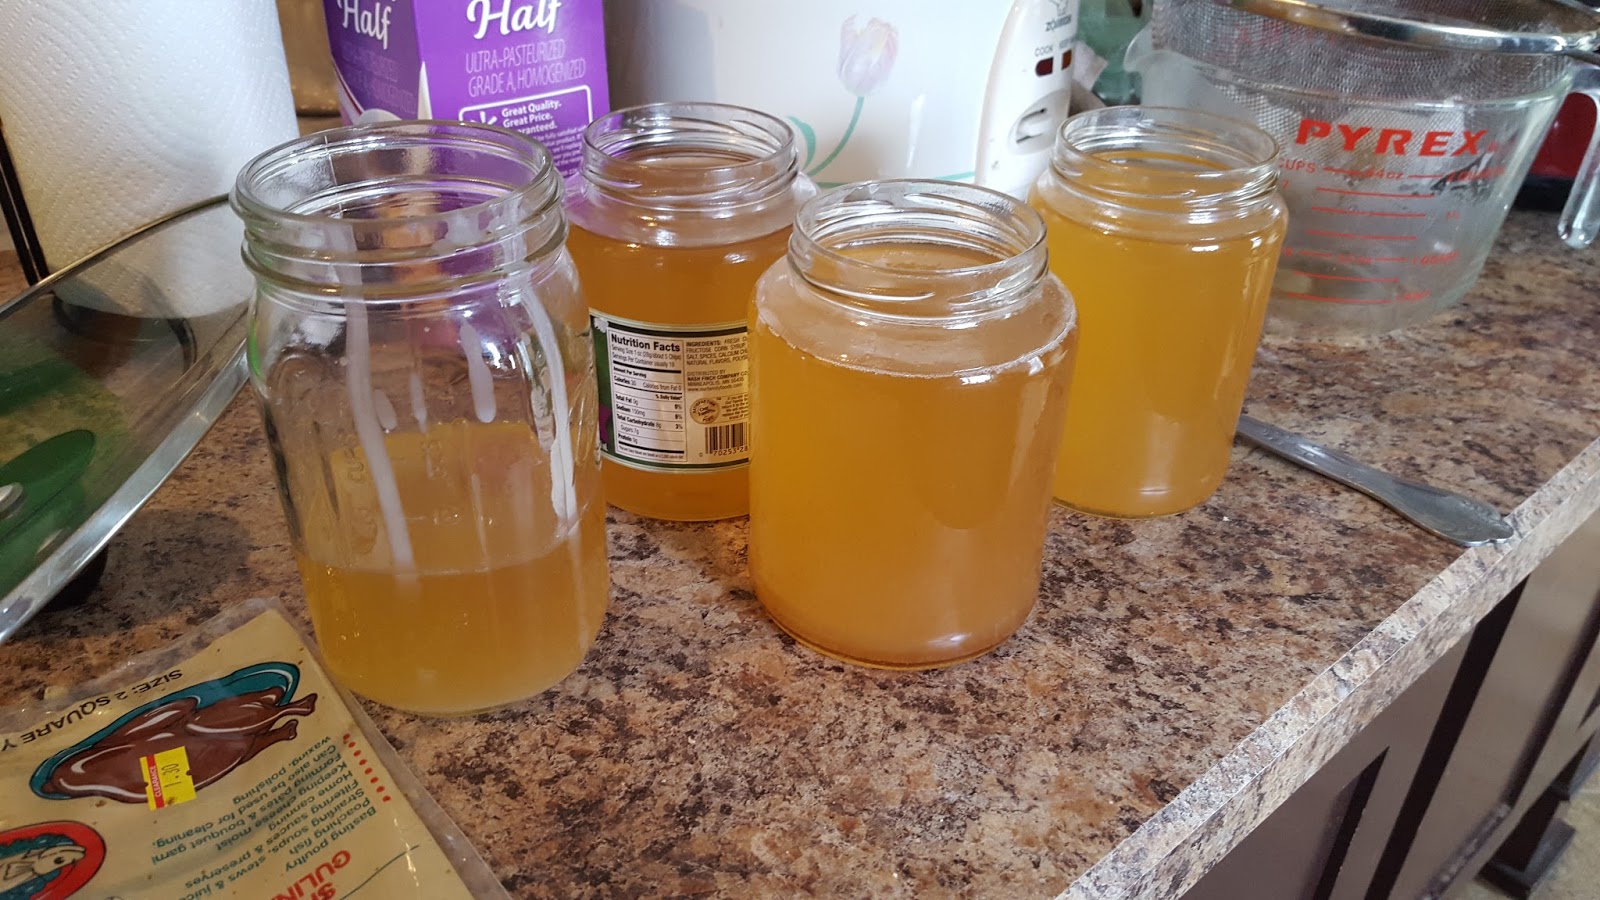
After leaving the crock pot to simmer overnight and deciding I wanted to speed up the finished product, I poured off the liquid into various jars (yes, those are mostly salvaged pickle jars, but lard keeps just fine in a dark, cool place), then moved the cracklings (all the bits of meat and tissue left from the rendering) over to my cast iron skillet to make them more, well, crackly.


If you've ever read about the rendering process in Laura Ingalls Wilder's Little House books, you'll know that they considered the cracklings a treat. They reminded me of sausage. And oh, the flavor! I was absolutely blown away by how good they tasted. And I'm not even a huge fan of pork!

After simmering the cracklings a while and draining off as much fat as I could, I bagged the cracklings for use later in cornbread and dressings.

The freshly rendered lard has a wonderful flavor as well. I can't wait to use it in the next batch of pie crust! I'm also curious to try rendering my own tallow from the frozen beef fat hidden in the bottom of my freezer ....

For the health benefits of pure, rendered lard, be sure to check out the abovementioned link at Mommypotamus. Fascinating! I suspect our forebears were more healthy than we think, and maybe from foods that we might not always guess. :)

Tuesday, August 4, 2015

Baking in a Beehive Oven by Cynthia Howerter


During a visit to Colonial Williamsburg, the enticing scent of burning firewood led me to colonial baker William Parker's outdoor beehive oven. One of the commercial baker's employees graciously explained the oven's construction and use while he waited for it to heat.

A colonial baker explains beehive oven baking


Commercial bakers in colonial villages and towns needed a sizeable oven in order to produce quantities of baked goods to sell in their shops. Because a large wood-fired oven throws off an excessive amount of heat, bakers often built outdoor beehive ovens, so named because the shape resembled beehives that were in use at the time.

How to build an outdoor beehive oven

After choosing a spot about 30-45 feet behind his building, Mr. Parker constructed a shelter to protect the oven and its baking operation from rain and snow. We can see from the shelter's scorched ceiling why Mr. Parker put distance between the oven and his shop.

A shelter protects the beehive oven from weather


Next, a raised wood platform was built under the shelter. Once the beehive oven is built on top of this sturdy base, the oven's opening will be about waist-high in order to make the oven easier to use and to spare the baker's back while he attends the oven for long hours.  

Two layers of bricks were placed on top of the wood foundation. The bricks help contain the oven's heat, with the top layer providing the oven's floor. 

To form the perimeter of the circular oven's base, one row of bricks was set in a circle on top of the oven floor and mortared into place. A single opening was left to provide access to the oven's interior.

Beehive oven set on a raised platform


How is the oven's domed roof constructed?

With the round oven base in place, several rows of bricks were laid on top, forming a vertical wall about one foot high. Once the mortar of this wall hardened, sand was heaped inside the circle and shaped into a rounded mound. The height of the sand determined the interior height of the oven.   

Next, bricks were laid on top of the existing brick wall and mortared, row by row, against the sloped sand, taking on the curved beehive shape until the sand was completely encased in brick. Mortar consisting of clay, sand, and straw was spread over the brick exterior and allowed to dry for several days. With the bricks in place and the mortar dried and set, all of the sand inside the dome was removed through the opening.

Time to use the oven

It's time to preheat the oven and start baking! Sticks of hardwood, such as oak, are laid in the center of the oven and set on fire. As a rule of thumb, the length of pre-heating is one-half the time of baking. So two hours of pre-heating are needed for four hours of baking and six hours of baking requires three hours of pre-heating.

Pre-heating the beehive oven


Waste not, want not

When the wood has burned into charred embers and ash, the interior heat of the beehive oven is about 1,200 degrees Fahrenheit. The baker removes the chunks of wood and sweeps the oven floor clean of the ash. Because nothing was wasted, the hot embers and ash were often taken into the kitchen and banked inside the cooking fireplace to keep a pot of food warm. The embers and ash could also be cooled and saved to be made into lye soap.

Burned embers


The oven will have to cool a bit before food can be inserted without being burned. An experienced baker can insert their bare arm inside the oven and tell by the feel of the heat on his skin if the correct baking temperature has been achieved. Another way to ascertain oven temperature is to place small pieces of dough inside the oven and watch whether they bake or burn. Additionally, some bakers toss flour on the oven's floor. If the flour doesn't burn, it's time to bake.

While the oven heats and cools, the baker prepares the foods, starting with baked goods that require the hottest temperature and ending with things that need the coolest. 

A trencher filled with risen dough

Hand-shaped dinner rolls placed on a floured pan


After inserting pans and trays of baked goods into the oven, the baker had to watch the progress of the baking through the oven's small opening and remove items when finished. Although this baker used pans, some bakers set the food directly on the hot brick oven floor.

I hope you enjoyed learning about beehive ovens. My husband will be happy to learn that I will never again complain about the eight minutes it takes my electric oven to preheat. What about you?


Award-winning author Cynthia Howerter is a member of the Daughters of the American Revolution (DAR). Her colonial-era novel-in-progress was recently awarded first place in historical fiction at the 2015 Florida Christian Writers Conference. Her first book, a non-fiction anthology titled God's Provision in Tough Times co-authored by La-Tan Roland Murphy, was a Selah Award finalist at the 2014 Blue Ridge Mountain Christian Writers Conference and has been in the top 100 paid Kindle e-books at Amazon.com. It can be purchased from Amazon, Barnes & Noble, and Christianbook.com.

Visit Cynthia's Website: Cynthia Howerter - all things historical

Photographs ©2015 Cynthia Howerter

Monday, January 20, 2014

Colonial Baking with the 17th Century English Housewife

When the English housewives stepped onto the shore in New England in the early 1600's, they missed their pippins, cream, butter and honey. Most of
all they missed their English wheat. Corn was the native crop, and the Indians generously shared their knowledge of planting, harvesting and preparing the golden kernels.

The immigrants wasted no time to plant their own crops of wheat with the seeds they brought from England, but it did not take well to the colder New England climate and the colonists soon discovered their survival depended on adapting. They could plant more corn per acre, and with less work. 

Grinding the corn into samp, as the Native Americans did, boiling water could be added for a porridge or pudding. 

Still, the colonial cook could not forget the beautiful wheat dough she pounded

and molded into beautiful loaves. Bread made with ground corn was flat, heavy and coarse. And so once again she adapted. She stretched her small stores of wheat and rye flour with the addition of the more abundant corn meal.

The early thirded bread, named for the three grains, was leavened with barm, or ale yeast, and baked in a round loaf. Boston brown bread is a later adaptation, using baking soda to leaven, and steam to cook the round loaf. 

It wasn't long before English cows were imported, and the English housewife could add milk to her samp porridge. So the next time you pour milk over your cornflakes, think of those brave colonial ladies who adjusted to a New World!

Here's a recipe for thirded bread, easy to adapt for today's kitchen!

Colonial Thirded Bread

1 cup wheat flour                1 teaspoonful salt
1 cup rye flour                    3 teaspoonful sugar
1 cup corn meal                  1/2 cup ale yeast 

Scald milk and cool. Mix your flours and meal together, then pour in milk until stiff enough to hold shape. Put the dough in the mounding board and set in a warm place overnight. In the morning, cut a criss-cross in the risen bread to give it one last spring and place in a hot oven.


A colonial oven was usually located outdoors, heated by a fire. After clearing out the hot coals, the dough would be placed directly on the floor of the oven with a shovel-like tool called a peel. The minute the oven door was opened the oven began to cool down, so the bread would need to bake for about 3 or 4 hours.


Rebecca DeMarino's passion of family, history, travel and writing collided when she boarded a plane with her mother and flew to Horton Point, Long Island and discovered her roots. Her debut novel, A PLACE IN HIS HEART, releases from Revell this June, book #1 of The Southold Chronicles. For more information please contact her at www.rebeccademarino.com and www.facebook.com/AuthorRebeccaDeMarino